Easy Marinara Sauce


This is going to be a recipe sans photo, since it got gobbled up too quickly by the two of us for me to photograph it.  But since I posted about the deliciousness of it on Facebook, my friends have been demanding I post the recipe, so here goes.

I got a food mill for Christmas, which I’d been wanting to put to use.  Not being consumers of mashed potatoes, baby food or applesauce, there were few things I could make using this shiny new tool.  I’d wanted to make my own tomato sauce from fresh tomatoes, since many sauces have onion powder added to them, which SB is allergic to.  On top of that, jarred pasta sauces are something I like to use for certain recipes, although after this recipe, I don’t know that I’ll ever buy a jarred sauce again.  Many jarred sauces have added corn syrup in addition to onions, neither of which SB can eat, so I set out to make my own.  I needed the recipe to be easy, tasty, and something I could make regularly.  I’ll say this:  as long as I have access to fresh Roma tomatoes, I’ll make this recipe over and over.

Here’s how I did it.  You will need:

  • about 2 pounds Roma tomatoes, cut lengthwise
  • non-stick cooking spray
  • 4 tablespoons olive oil, plus 1 extra for sauteeing the garlic
  • 3 tablespoons tomato paste
  • 3 cloves fresh garlic, chopped into small pieces but not minced (I like mine a bit more rustic)
  • 1 tablespoon fresh basil (you can increase this as you like)
  • kosher salt

Preheat your oven to 375 degrees F.  Meanwhile, prepare a rimmed baking sheet by spraying it with a bit of non-stick cooking spray.  Arrange the halved tomatoes in rows on the sheet, and drizzle the olive oil over the tomatoes so that they are lightly coated with the oil.  Sprinkle salt over the tops of the tomatoes, and place the pan on the middle rack of the oven for 30-45 minutes, or until the skins just start to brown and the tomatoes are nice and soft–keep an eye on the tomatoes, because you don’t want them to get too brown.

Remove them from the oven, and allow them to cool for about 30 minutes.  For the next step you can elect to use either a food mill, or a blender.  I didn’t want skin or seeds in my sauce, so the food mill was perfect.

I put the fine grinding disc into my food mill because I wanted a smooth sauce.  Placing the food mill over a bowl, put the tomatoes in (carefully so you don’t lose any juice!) and turn the handle so that you can get as much lovely puree as possible.  If you use a blender, just put all the roasted tomatoes in the blender and puree.

Finally, heat 1 tablespoon of olive oil in a saucepan or other pan (I used a Dutch oven since I was going to heat meatballs in it with the sauce) and lightly saute the garlic.  Once the garlic softens, add the puree, tomato paste, and basil.  Stir over medium heat so that the sauce thickens up a bit.  Cook over medium-low heat so the flavors meld and serve with your favorite pasta.

This recipe made about 2 cups of sauce, which I served over homemade meatballs and al dente spaghetti.

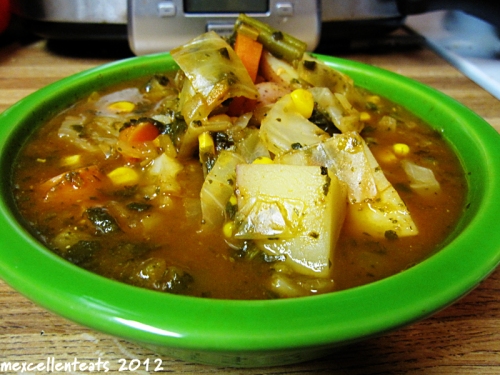
Super Easy Vegetable Soup


The week of Ash Wednesday, I decided I’d eat meatless for every meal. I figured since Lent was about sacrifice, I should give up something for the short term, and something for the long term. So I decided that meat would be nixed for the week, and that I’d give up diet sodas for the duration of Lent. The challenge was trying to eat enough different things without getting bored with my food (which I did, quickly), and while getting enough protein (which I didn’t do). I started that Sunday before Ash Wednesday, and finished up on the following Saturday. By the time that next Sunday rolled around, I was ravenous for meat–my body craved protein, and specifically, I craved meat-derived protein. Needless to say, I don’t think I could be vegetarian, and I certainly could not be vegan.

Last week, I had a craving for a really good vegetable soup. I decided while I was doing the shopping that I’d put together a big pot of it and eat on it all week long. Since SB is trying to eat a Paleolithic-style diet, which eschews legumes and tubers, he wouldn’t be eating this soup, so I was able to put onions in it. The final product was outstanding, and was great for lunches and dinners all week long.

A really simple, flavor-packed vegetable soup that could easily be made vegetarian with the substitution of vegetable broth in place of the chicken broth used here.

Here is how I did it. You will need:

  • 8 small creamer potatoes, skins on, washed and cut into quarters
  • 1 24-ounce jar/can tomato puree, plus water to rinse out the can/bottle
  • 5 carrots, washed, cut into coins (about 3 cups)
  • 4 cups cabbage, cut into bite-sized pieces
  • 2 cups frozen green beans
  • 2 cups frozen corn kernels
  • 1 package frozen chopped spinach
  • 2 cups diced onions
  • 2 cups diced celery
  • 2 tablespoons fresh parsley
  • 3 tablespoons minced garlic
  • 2 tablespoons black pepper
  • 2 cups chicken stock
  • 2 tablespoons chicken base
  • 2 tablespoons olive oil
  • salt, to taste

In a large stockpot, heat the olive oil over medium high heat. When the oil is hot, add your onions, celery, garlic and parsley. Saute these vegetables until they are soft, but do not brown them. Next, add your chicken stock and tomato puree plus water to rinse out the jar/can–you want all that yummy tomato flavor in the soup.

Add the potatoes, green beans, corn kernels, carrots, cabbage, spinach and pepper. Add enough water to cover everything and stir thoroughly to mix. The soup will be very thick, almost like a stew. Allow this to come to a slow bubble, and then add in the chicken base. Stir this in and allow it to blend in with the soup. Reduce your heat to low-medium-low and allow the soup to simmer for about an hour.

Serve while hot. I cooked mine in a 6-quart stockpot, and had more than enough soup for the week. In fact, I froze what I did not eat (about 2 1/2 quarts) for later. This soup reheats beautifully, and is quite good. It could be made completely vegetarian with the substitution of vegetable stock in place of the chicken stock. Really, you could use any vegetables you like…your palate is your limit!

Sticky Chicky Wings


Shopping at the grocery store this past weekend for a Super Bowl party inspired me to make some wings for dinner one night this week. Now you’re probably thinking, but aren’t wings really unhealthy? Not if you marinate them overnight in a yummy sauce and then bake them. I realize that the wing is a decently fatty part of the chicken, but it has a lot of flavor. At least the baked type are more healthy than their fried counterparts!

Craving wings? Craving Asian flavors? Make these!

I had some sake and mirin sitting around that I’d bought a while back in a lame attempt to recreate these wings served at David Chang’s Momufuku restaurant in New York City. Last spring, I’d taken a cooking class called “Great Restaurants of New York” and that particular recipe was one that our chefs had us prepare, with a few modifications–for example, we used a sous vide cooker to cook them rather than cook them in the 5 cups of duck fat the original recipe calls for. The flavor of the finished wings was indescribable, but one I knew I’d want to eat over and over again.

So this week, I decided to make sticky chicken wings with a marinade that I’d cobbled together and that turned out to have a similar flavor to the wings we’d made in class minus the smokiness that David Chang’s recipe has. I served ours alongside a quickie fried rice I threw together with frozen veggies and steamed rice. No eggs or scallions, of course. 🙂

Here’s how I did it. You will need:

  • 1/4 cup honey
  • 1/2 cup low-sodium soy sauce
  • 1/2 teaspoon five spice powder (if you don’t have this, you can use a blend of ground anise, cinnamon, ground ginger, ground fennel and black pepper. A good guideline for how to mix this is here.)
  • 2 tablespoons mirin**
  • 1 tablespoon dry sake**
  • 1 teaspoon sesame oil
  • 12 chicken wings, tips removed and reserved for another use (make a stock! don’t let these guys go to waste!)

*Mirin is sweet rice wine. You can substitute sake plus a bit of sugar for it. You can also substitute sweet sherry for the mirin and sake if you don’t have either in your pantry. White wine would also work here.

In a small bowl, add the first 6 ingredients and whisk together until they are thoroughly mixed. In a gallon-sized ziplock bag, add the chicken wings and pour the marinade over the wings. Zip the bag closed, and lay it in a baking dish in your refrigerator so that it sits overnight.

The next day, when you’re ready to cook them, preheat your oven to 375 degrees F. Prepare a baking sheet with a piece of parchment paper and remove the wings from the bag, laying them on the paper. Bake for 20-30 minutes, depending on how meaty your wings are (ours were quite meaty, so they required more time), and then turn the wings over, cooking for an additional 10-15 minutes. They will develop a gorgeous smell as they cook, and their color is as rich as the flavor.

This recipe made 2 servings of 6 drummettes each. I think I’ll use this marinade for larger cuts of chicken as well in the future. It really had a great flavor, and SB inhaled his plate. I deem dinner a success based on that alone.

Apple-Pecan Upside Down Cake


Those who know me well know that while I am a pretty good cook, baking is simply not my forte.  I think it has to do with the fact that baking = precision and chemistry, whereas cooking is more freestyle and loose.  You can experiment a lot more during the cooking of a dish than you can during the baking of something–after all, have you ever been able to make adjustments mid-bake to a cake you put in the oven?

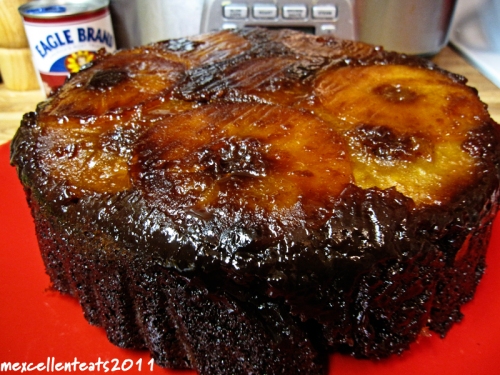
We are headed to my aunt’s tomorrow for a get-together of a few of my mom’s siblings (she has 12 that still survive of the original 15), and I offered to bring a dessert.  I wanted something that wasn’t traditional holiday fare, like pumpkin, apple or cherry pie.  I was inspired on a trip to Central Market last week by the gorgeous apple display they’ve got in the produce department–there are no fewer than a dozen varieties of apples there!–and decided I’d bake a cake using apples.  But what kind of cake to bake?  After a bit of thought, I decided I’d go the upside down route.  Furthermore, I decided I’d get crazy and bake it in the Dutch oven I’ve got.  The result:

A variation of the upside down cake with a bourbon-tinged glaze that uses tart Granny Smith apples to balance the sweetness of the cake.

Earlier in the week, I’d made one that didn’t turn out nearly as beautiful as this one, but that was equally delicious.  I took a few liberties with this recipe and made it my own.  Here’s how I did it.  You will need:

For the glaze:

  • 1/2 cup dark brown sugar
  • 2 tablespoons good bourbon (Knob Creek is what I used)
  • 1/4 cup Lyle’s Golden Syrup (I used this due to SB’s corn allergy; you may use corn syrup as Lyle’s is a specialty item)
  • 1/2 teaspoon ground cinnamon
  • 1/4 cup (1/2 stick) unsalted butter
  • 2 tablespoons thawed apple juice concentrate (or if you have the patience to make it, boiled cider)

Place all of the above ingredients into a microwave safe bowl and heat until the sugar is dissolved, about 2 minutes.

For the cake:

  • 2 1/4 cups all-purpose flour
  • 2 1/4 teaspoons baking soda
  • 1 teaspoon salt
  • 2 teaspoons ground cinnamon
  • 1 teaspoon freshly ground nutmeg
  • 1/2 cup (1 stick) unsalted butter
  • 1 cup white granulated sugar
  • 1 cup dark brown sugar
  • 3 eggs
  • 2 teaspoons vanilla extract
  • 2 tablespoons thawed apple juice concentrate
  • 1/4 cup good bourbon (I used Knob Creek)
  • 3 very large Granny Smith apples, peeled and cored (about 2 pounds)
  • 2 cups chopped pecans

Preheat your oven to 350 degrees F.  Grease the inside of a 5-quart Dutch oven (or use a sufficiently large cake pan, with at least 4″ walls) and line the interior of the pan with parchment paper.  Grease the parchment paper as well–nonstick cooking spray is excellent for this purpose.

Peel and core one of the apples and slice it horizontally into 1/4″ slices so that the apple slices come off as rings.  Layer the apple rings in the bottom of the greased parchment in two layers that overlap one another (you can see this in the finished cake above).  Pour the glaze over the apple slices and allow this to sit while you make the batter.

Peel, core and grate the remaining apples and reserve in a bowl.  Set aside.  They will turn brown, but no worries since you will be folding them into the batter later.

Place your flour, salt, baking soda, and spices into a mixing bowl and sift them together, setting this aside.  In a large mixing bowl, cream the butter and sugars until fluffy.  Beat in the bourbon and vanilla, and then add the eggs one at a time.  Slowly beat in the flour mixture until it is fully incorporated with the sugar and eggs.  Finally, fold in the shredded apples.

Pour the batter into the pan containing the apples and glaze.  Cover the top of the batter with the pecans, taking care to evenly distribute them across the surface of the batter.  Bake for 70 minutes or until a wooden pick inserted into the center comes out clean.

Once done, allow the cake to cool in the pan for about 30 minutes.   Here’s where the removal gets a bit dicey.  I’ll tell you what I did to get it out of the pan, but feel free to remove it however you see fit.

I had two plates at the ready–one for serving, and one to hold the cake while I inverted it.  I pulled the cake out of the Dutch oven using the parchment paper and carefully laid it on one plate (not the serving platter).  I very carefully peeled the parchment from the perimeter of the cake, which took little effort since I sprayed the paper down with nonstick cooking spray.  Then I laid the serving platter upside down onto what is the bottom surface of the cake (pecan side) and carefully turned the cake over onto the serving platter and slowly removed the parchment so that I wouldn’t lose any apples from the top surface of the cake.

Now, I haven’t eaten a piece of this one but based on the one I made earlier in the week, I can tell you it is sweet and really needs either whipped cream or vanilla ice cream to temper it.  It is a moist cake, owing to the shredded apples throughout, and is just plain GOOD.

Maple-Orange Glazed Turkey Breast, plus brine


For some people (like my husband), turkey isn’t a meat they particularly care to eat at any time of year, much less Christmas.  Let’s face it, turkey gets top billing at most holiday tables, and because so much tends to be consumed, rarely is it made and eaten again during the year.  Personally, I’m a fan of turkey because it’s generally pretty lean and can be flavored many different ways, like chicken.  So I’m down to eat turkey whenever, wherever.

I decided we’d have fancy Christmas dinner at home on Christmas Eve (which didn’t materialize–long story) and that we’d have turkey breast.  Since there are only two of us with a very small freezer whose space is at a premium, it makes no sense to buy an entire bird for two.   The grocery store where we shop sells bone-in split turkey breast, so I bought two of those and decided to go from there.

Back in 2007, I’d made a maple glazed bird for a family Christmas gathering at my mom’s that was very well received.  I’d bought the bird, pre-brined by the butcher and then coated it with a maple herb butter concoction I’d made, basting it once it began cooking so that it would all seep into the bird evenly.  This time, I didn’t have a whole bird, and I didn’t want just a maple flavor.  I also didn’t have brined turkey to work with since I’d bought fresh split breasts.

Now you’re probably thinking, “Brine?  Isn’t that just salt water?”  Yeah it is, but I gotta tell you:  It’s all about the brine, baby.  If the only turkey you’ve ever eaten said “Butterball” on it, you’ve had a somewhat brined bird–you just didn’t realize it.  Next time you buy one of those, look at the label for the part that says “injected with __% saline solution.”  That’s a type of brine.

The brine is what helps keep the bird moist during the cooking time by relaxing the proteins of the muscle fibers somewhat.  For a more thorough explanation, read more here.  The great thing about brining a bird (it also works for lean pork too) is that it can help impart great flavor, dependent on what is in the brine mixture.  Because I wanted my bird to have a maple-orange flavor throughout and not just on the skin, I crafted my brine with those flavors too.

After I brined my turkey breasts for almost 2 days, then I roasted them off in the oven and oh my word…

When there are only two people eating, bone-in turkey breast is a great way to still have turkey for the holidays. The key to cooking the breast here is the brine.

I’m not gonna lie, this was the best turkey breast I have ever eaten:  juicy, full of flavor and absolutely gorgeous coming out of the oven.  So without further ado, here’s how you can make your own.  I’ll warn you, this is a several-day process, so don’t read this expecting to get it on your dinner table tonight or even tomorrow night.  It took me 3 days to get the above result.  Also, you will have to adjust your quantities for the amount of bird you are cooking.  The brine recipe was for 2 split bone-in breasts that were about 7 pounds total.

Here’s how I did it.  You will need:

For the brine:

  • 4 quarts of water
  • 6-8 sprigs fresh thyme
  • 2 tablespoons garlic, minced
  • 3/4 cup kosher salt
  • 1/2 cup dark maple syrup
  • 3/4 cup dark brown sugar
  • peel of one orange (I used a vegetable peeler to remove just the peel, taking care not to get any of the white pith underneath)
  • 2 tablespoons peppercorns

In a large stockpot, dissolve the salt and sugar in the water.  Add the syrup, thyme, garlic, peppercorns and orange peel, stirring to mix.  Allow this mixture to come to a slight boil.  Once the flavors have had a chance to marry, remove this from the heat and cool completely in the refrigerator (overnight is best).  NOTE:  some people like to cool their brines immediately with ice, and then plunge their birds into the diluted brine.  I elected not to do this, since it would dilute the mixture and thus dilute the flavor.  This is one reason this process took a long time.  Also, note that this brine recipe is not terribly salty, so your bird will not take on a salty flavor if you are worried about such things.  It won’t be sweet either, even though there is a lot of sweet going on here.

To prepare the turkey for brining the next day, you will need:

  • 2 fresh split bone-in turkey breasts, about 7 pounds total

You have a couple of options here.  You can either plunge the turkey directly into the cold brine, and let it sit in the pot you cooked the brine in, or you can do what I did.  I got a large 3-quart baking dish and a couple of gallon ziplock bags.  I placed a turkey breast in each bag, and set the bags into the baking dish.  I then used a ladle to cover the meat with the brine, sealed the bags tightly, making sure much of the air was pushed out (so that room could be made for liquid) and set them flat in the refrigerator so that the meat was submerged in the brine.  I allowed this to sit for roughly 36 hours.

You can also make the Maple-Orange Herb Butter ahead of time so that when it is time to finally cook the bird, everything is ready.  Here’s how I made it.  You will need:

  • 1 cup freshly squeezed orange juice
  • 1 stick unsalted butter
  • 1/2 cup maple syrup
  • 2 teaspoons fresh thyme leaves
  • salt to taste

In a saucepan, heat the orange juice to a boil, cooking until its volume is reduced by half.  Add the maple syrup and butter, melting the butter.  Whisk in the thyme, whisking the mixture so the butter incorporates with the reduced juice and syrup.  Pour the mixture into a container and refrigerate until slightly solid.  You will smear this onto the turkey before and during cooking.

After the breasts were sufficiently brined, here is how I cooked them.

Preheat your oven to 325 degrees F.  Remove the breasts from the brine and give them a quick rinse.  Set them on a jelly roll pan covered in parchment paper (easy cleanup, for the win!) and coat the tops of the breasts with the maple-orange herb butter you prepared earlier.  If you can, slide some of the butter mixture under the skin as well, since this will give the bird more flavor (and who doesn’t like that?).  Roast the breasts for about 2 hours, drizzling the butter mixture over the top about every 45 minutes.  The turkey will be done when a meat thermometer inserted into the thickest part of the breast reads 170-180 degrees.

Let the meat sit for about 15 minutes before cutting into it, or you risk releasing all that lovely juiciness of the meat onto your serving plate, and then you’ll be sad that you worked so hard to make a juicy bird only to have the juices on the plate and not in your mouth.

Since I cooked two breasts, this recipe served 2 adults for 2 meals.  I will seriously make turkey breast this way from now on.  Labor intensive?  Yes.  Flavor intensive?  Oh yeah.